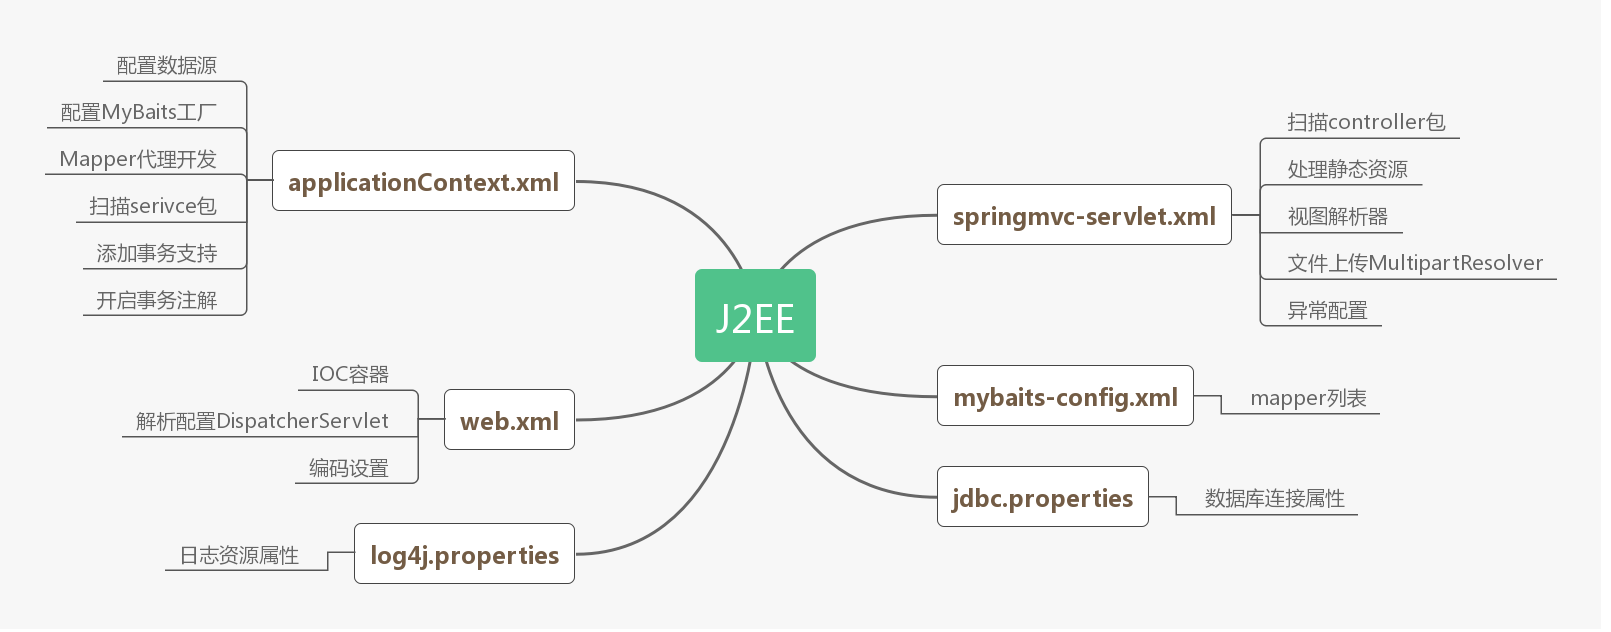
先把配置文件捋清楚
SSM框架中有几个比较重要的配置文件,一开始学起来会很模糊,这里做一下整理
当一个web程序启动时,Tomcat服务器最先会读取 web.xml 文件,这个文件中会启动一些配置,还会启动Spring配置文件**applicationContext.xml** 和SpringMVC配置文件 springMVC-servlet.xml 这两个文件,在运行 applicationContext.xml 的时候会启动MyBatis的配置文件 myBatis.xml,并且会调用到 jdbc.properties 和 log4J.properties 两个资源属性文件里的属性。

web.xml#
接下来先看看最先启动的 web.xml 是都怎么配置。
在Spring配置中和在Servlet配置中,就启动了applicationContext 和 SpringMVC-servlet 两个配置文件
1
2
3
4
| <context-param>
<param-name>contextConfigLocation</param-name>
<param-value>classpath:applicationContext.xml</param-value>
</context-param>
|
1
2
3
4
5
6
7
8
9
10
11
| <!--部署Servlet分发器 DispatcherServlet-->
<servlet>
<servlet-name>springer</servlet-name>
<servlet-class>org.springframework.web.servlet.DispatcherServlet</servlet-class>
<!--注册DispatcherServlet的配置文件-->
<init-param>
<param-name>contextConfigLocation</param-name>
<param-value>classpath:springer-servlet.xml</param-value>
</init-param>
<load-on-startup>1</load-on-startup>
</servlet>
|
运行到这的时候就会调用到上述两个文件。
整个文件如下:
1
2
3
4
5
6
7
8
9
10
11
12
13
14
15
16
17
18
19
20
21
22
23
24
25
26
27
28
29
30
31
32
33
34
35
36
37
38
39
40
41
42
43
44
45
46
47
48
49
50
51
52
53
54
55
56
57
58
59
60
61
62
63
64
65
66
67
68
69
70
71
72
73
74
| <?xml version="1.0" encoding="UTF-8"?>
<web-app
xmlns:xsi="http://www.w3.org/2001/XMLSchema-instance"
xmlns="http://xmlns.jcp.org/xml/ns/javaee"
xsi:schemaLocation="http://xmlns.jcp.org/xml/ns/javaee http://xmlns.jcp.org/xml/ns/javaee/web-app_3_1.xsd"
id="WebApp_ID" version="3.1">
<!--以下配置的加载顺序:先 ServletContext >> context-param >> listener >> filter >> servlet >> spring-->
<!-- ==================== 欢迎页配置 ==================== -->
<!--配置欢迎页-->
<welcome-file-list>
<welcome-file>index.jsp</welcome-file>
</welcome-file-list>
<!-- ==================== Spring配置 ==================== -->
<!--启动Spinrg 配置文件 applicationContext.xml-->
<context-param>
    <param-name>contextConfigLocation</param-name>
    <param-value>classpath:applicationContext.xml</param-value>
</context-param>
<!--配置监听器,加载Spring 配置文件-->
<listener>
<listener-class>org.springframework.web.context.ContextLoaderListener</listener-class>
</listener>
<!-- ==================== Serlvet配置 ==================== -->
<!--部署Servlet分发器 DispatcherServlet-->
<servlet>
<servlet-name>springer</servlet-name>
<servlet-class>org.springframework.web.servlet.DispatcherServlet</servlet-class>
<!--注册DispatcherServlet的配置文件-->
<init-param>
<param-name>contextConfigLocation</param-name>
<param-value>classpath:springer-servlet.xml</param-value>
</init-param>
<load-on-startup>1</load-on-startup>
</servlet>
<!--配置DispatcherServlet的作用范围,这里作用于整个web目录-->
<servlet-mapping>
<servlet-name>springer</servlet-name>
<url-pattern>/</url-pattern>
</servlet-mapping>
<!-- ==================== 过滤器配置 ==================== -->
<!--配置过编码滤器-->
<filter>
<filter-name>characterEncodingFilter</filter-name>
<filter-class>org.springframework.web.filter.CharacterEncodingFilter</filter-class>
<!--编码格式:UTF-8-->
<init-param>
<param-name>encoding</param-name>
<param-value>UTF-8</param-value>
</init-param>
<!--是否全部过滤,包括符合格式的文件/请求-->
<init-param>
<param-name>forceEncoding</param-name>
<param-value>true</param-value>
</init-param>
</filter>
<!--配置过滤器的作用范围,这里作用于整个WEB目录-->
<filter-mapping>
<filter-name>characterEncodingFilter</filter-name>
<url-pattern>/*</url-pattern>
</filter-mapping>
<!-- ==================== 错误页面配置 ==================== -->
<!--404错误页面注册-->
<error-page>
<error-code>404</error-code>
<location>/WEB-INF/jsp/404.jsp</location>
</error-page>
</web-app>
|
applicationContext.xml#
这个文件是第二个启动的配置文件
在这个文件里主要做了几件事情:
- 加载jdbc.properties资源属性文件
- 配置数据源
- 配置Mybatis工厂
- 指定数据源
- 指定Mybatis配置文件
- 批量配置Mapper接口
- 设置需要扫描的dao包
- 配置sqlSessionFactory对象
- 添加事务支持
- 配置事务管理器
- 配置通知
- 配置切面
- 扫描service包
下面一个一个解释:
1.加载jdbc.properties#
1
| <context:property-placeholder location="classpath:jdbc.properties" />
|
把连接数据库的一些数据分离出来写在jdbc.properties这个文件中,加载了这个文件就可以使用这些属性
而在 jdbc.properties 文件中的内容如下(这里演示的是MySQL8.0):
1
2
3
4
5
6
7
| jdbc.driver=com.mysql.cj.jdbc.Driver
jdbc.url=jdbc:mysql://localhost:3306/transactional?useSSL=false?serverTimezone=Hongkong?characterEncoding=utf-8?autoReconnect=true
jdbc.username=root
jdbc.password=123456
jdbc.maxTotal=30
jdbc.maxIdle=10
jdbc.initialSize=5
|
至于如何调用,则在下面的配置数据源中演示
2.配置数据源#
 1
 2
 3
 4
 5
 6
 7
 8
 9
10
11
12
| <bean id="dSource" class="org.apache.commons.dbcp2.BasicDataSource">
<property name="driverClassName" value="${jdbc.driver}"/>
<property name="url" value="${jdbc.url}"/>
<property name="username" value="${jdbc.username}"/>
<property name="password" value="${jdbc.password}"/>
<!-- 最大连接数 -->
<property name="maxTotal" value="${jdbc.maxTotal}"/>
<!-- 最大空闲连接数 -->
<property name="maxIdle" value="${jdbc.maxIdle}"/>
<!-- 初始化连接数 -->
<property name="initialSize" value="${jdbc.initialSize}"/>
</bean>
|
在上面已经加载了jdbc.properties,所以在配置数据源的时候直接用 ${属性名} 就可以使用该属性。这样做的好处是,在多处调用 jdbc.properties 里的那些属性的时候,如果要该一个属性比如数据库密码,只需要修改jdbc.properties 中的 jdbc.password 的值就行了。
3.配置Mybatis工厂#
1
2
3
4
5
6
7
8
| <!-- 配置MyBatis工厂,同时指定数据源,并与MyBatis完美整合 -->
<bean id="sqlSessionFactory" class="org.mybatis.spring.SqlSessionFactoryBean">
<!--指定数据源-->
<property name="dataSource" ref="dSource"/>
<!-- configLocation的属性值为MyBatis的核心配置文件 -->
<property name="configLocation" value="classpath:mybatis-config.xml"/>
</bean>
|
注意指定数据源的 <property> 标签中的 ref 属性,要和数据源的 id 对应
在第二个 <property> 中指定和启动了Mybatis的配置文件
4.配置数据映射接口#
数据映射接口,也就是dao,通过Mybatis配置文件映射到数据库操作文件
1
2
3
4
5
| <bean class="org.mybatis.spring.mapper.MapperScannerConfigurer">
<!-- mybatis-spring组件的扫描器 ,必须写全dao的包名,且只能扫描一个dao包 -->
<property name="basePackage" value="dao"/>
<property name="sqlSessionFactoryBeanName" value="sqlSessionFactory"/>
</bean>
|
配置以后,Spring会自动扫描MyBatis的接口并装配(Spring将指定包中所有被@Mapper注解标注的接口自动装配为MyBatis的映射接口)
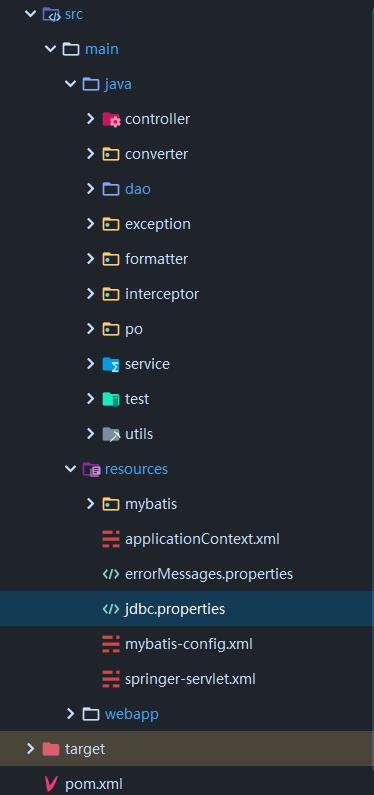
在Eclipse中的进行项目的话要写全dao 的包名,比如 com.github.java.dao 这样,而在IDEA中一般会配置好项目的source root 根目录 和 resource root 资源目录,所以写dao包名就好。
例如我的目录结构,我设置了java为source root 根目录,所以不用写全包名
5.添加事务支持#
1
2
3
4
5
| <bean id="txManager" class="org.springframework.jdbc.datasource.DataSourceTransactionManager">
<property name="dataSource" ref="dSource" />
</bean>
<!-- 开启事务注解 -->
<tx:annotation-driven transaction-manager="txManager" />
|
事务支持有很多种方法,这种是基于@Transactional注解的事务管理。
还有一种是声明式事务管理
6.扫描service包#
1
| <context:component-scan base-package="service"/>
|
完整文件#
1
2
3
4
5
6
7
8
9
10
11
12
13
14
15
16
17
18
19
20
21
22
23
24
25
26
27
28
29
30
31
32
33
34
35
36
37
38
39
40
41
42
43
44
45
46
47
48
49
50
51
52
53
54
55
56
57
58
59
60
61
62
63
64
65
66
67
68
69
| <?xml version="1.0" encoding="UTF-8"?>
<beans xmlns="http://www.springframework.org/schema/beans"
xmlns:xsi="http://www.w3.org/2001/XMLSchema-instance"
xmlns:context="http://www.springframework.org/schema/context"
xmlns:tx="http://www.springframework.org/schema/tx"
xsi:schemaLocation="http://www.springframework.org/schema/beans
http://www.springframework.org/schema/beans/spring-beans.xsd
http://www.springframework.org/schema/context
http://www.springframework.org/schema/context/spring-context.xsd
http://www.springframework.org/schema/tx
http://www.springframework.org/schema/tx/spring-tx.xsd">
<!--=================== 加载jdbc.properties ===================-->
<context:property-placeholder location="classpath:jdbc.properties"/>
<!--======================== 配置数据源 ========================-->
<bean id="dSource" class="org.apache.commons.dbcp2.BasicDataSource">
<property name="driverClassName" value="${jdbc.driver}"/>
<property name="url" value="${jdbc.url}"/>
<property name="username" value="${jdbc.username}"/>
<property name="password" value="${jdbc.password}"/>
<!-- 最大连接数 -->
<property name="maxTotal" value="${jdbc.maxTotal}"/>
<!-- 最大空闲连接数 -->
<property name="maxIdle" value="${jdbc.maxIdle}"/>
<!-- 初始化连接数 -->
<property name="initialSize" value="${jdbc.initialSize}"/>
</bean>
<!--======================== 配置MyBatis工厂 ========================-->
<!-- 配置MyBatis工厂,同时指定数据源,并与MyBatis完美整合 -->
<bean id="sqlSessionFactory" class="org.mybatis.spring.SqlSessionFactoryBean">
<property name="dataSource" ref="dataSource" />
<!-- configLocation的属性值为MyBatis的核心配置文件 -->
<property name="configLocation" value="classpath:com/mybatis/mybatis-config.xml" />
</bean>
<!--======================== Mapper代理 ========================-->
<!--Mapper代理开发,使用Spring自动扫描MyBatis的接口并装配(Spring将指定包中所有被@Mapper注解标注的接口自动装配为MyBatis的映射接口) -->
<bean class="org.mybatis.spring.mapper.MapperScannerConfigurer">
<!-- mybatis-spring组件的扫描器 ,必须写全dao的包名,且只能扫描一个dao包 -->
<property name="basePackage" value="com.dao" />
<property name="sqlSessionFactoryBeanName" value="sqlSessionFactory" />
</bean>
<!--======================== 扫描Service包 ========================-->
<!-- dao包在mybatis-spring组件中已经扫描,这里不再需要扫描 -->
<context:component-scan base-package="com.service" />
<!--======================== 配置事务支持 ========================-->
<!-- 添加事务支持 -->
<bean id="txManager" class="org.springframework.jdbc.datasource.DataSourceTransactionManager">
<property name="dataSource" ref="dataSource" />
</bean>
<!-- 开启事务注解 -->
<tx:annotation-driven transaction-manager="txManager" />
</beans>
|
SpringMVC-servlet.xml#
 1
 2
 3
 4
 5
 6
 7
 8
 9
10
11
12
13
14
15
16
17
18
19
20
21
22
23
24
25
26
27
28
29
30
31
32
33
34
35
36
37
38
39
40
41
42
43
44
45
46
47
48
49
50
51
52
53
54
55
56
57
58
59
60
61
62
63
64
65
66
67
68
69
70
71
72
73
74
75
76
77
78
79
80
81
82
83
84
85
86
87
88
89
90
91
92
93
94
95
96
97
98
99
100
101
102
103
104
105
106
107
108
109
110
111
112
113
114
| <?xml version="1.0" encoding="UTF-8"?>
<beans xmlns="http://www.springframework.org/schema/beans"
xmlns:xsi="http://www.w3.org/2001/XMLSchema-instance"
xmlns:context="http://www.springframework.org/schema/context"
xmlns:mvc="http://www.springframework.org/schema/mvc"
xmlns:p="http://www.springframework.org/schema/p"
xsi:schemaLocation="http://www.springframework.org/schema/beans
http://www.springframework.org/schema/beans/spring-beans.xsd
http://www.springframework.org/schema/context
http://www.springframework.org/schema/context/spring-context.xsd
http://www.springframework.org/schema/mvc
http://www.springframework.org/schema/mvc/spring-mvc.xsd">
<context:component-scan base-package="controller"/>
<context:component-scan base-package="converter"/>
<context:component-scan base-package="formatter"/>
<context:component-scan base-package="utils"/>
<context:component-scan base-package="po"/>
<mvc:annotation-driven/>
<mvc:resources location="/css/" mapping="/css/**"/>
<mvc:resources location="/html/" mapping="/html/**"/>
<mvc:resources location="/images/" mapping="/images/**"/>
<!--==================== 配置视图解析器 ====================-->
<bean class="org.springframework.web.servlet.view.InternalResourceViewResolver" id="internalResourceViewResolver">
<property name="prefix" value="/WEB-INF/jsp/"/>
<property name="suffix" value=".jsp"/>
</bean>
<!--==================== 注册类型转换器 ====================-->
<bean id="conversionService" class="org.springframework.context.support.ConversionServiceFactoryBean">
<property name="converters">
<list>
<bean class="converter.GoodsConverter"/>
</list>
</property>
</bean>
<!--启动类型转换器-->
<mvc:annotation-driven conversion-service="conversionService"/>
<!--==================== 注册格式化转换器 ====================-->
<bean id="formattingConversionService"
class="org.springframework.format.support.FormattingConversionServiceFactoryBean">
<property name="formatters">
<set>
<bean class="formatter.GoodsFormatter"/>
</set>
</property>
</bean>
<!--启动格式化转换器-->
<mvc:annotation-driven conversion-service="formattingConversionService"/>
<!--==================== 配置校验器 ====================-->
<!--配置错误消息资源-->
<bean id="msgSource" class="org.springframework.context.support.ReloadableResourceBundleMessageSource">
<property name="basenames" value="errorMessages"/>
<!--资源文件编码格式-->
<property name="fileEncodings" value="utf-8"/>
<!--对资源文件内容缓存时间,单位秒-->
<property name="cacheSeconds" value="120"/>
</bean>
<!--注册校验器-->
<bean id="validator" class="org.springframework.validation.beanvalidation.LocalValidatorFactoryBean">
<!--hibernate校验器-->
<property name="providerClass" value="org.hibernate.validator.HibernateValidator"/>
<!--指定校验使用的资源为将,在文件中配置校验错误信息-->
<property name="validationMessageSource" ref="msgSource"/>
</bean>
<!--启动spring的valid校验功能-->
<mvc:annotation-driven conversion-service="conversionService" validator="validator"/>
<!--==================== 配置拦截器 ====================-->
<mvc:interceptors>
<!--<bean class="interceptor.AllInterceptor"/>-->
<mvc:interceptor>
<mvc:mapping path="/**"/>
<mvc:exclude-mapping path="/"/>
<bean class="interceptor.Interceptor1"/>
</mvc:interceptor>
<mvc:interceptor>
<mvc:mapping path="/five"/>
<bean class="interceptor.Interceptor2"/>
</mvc:interceptor>
</mvc:interceptors>
<!--==================== 配置文件上传和下载 ====================-->
<bean id="multipartResolver" class="org.springframework.web.multipart.commons.CommonsMultipartResolver"
p:defaultEncoding="UTF-8"
p:maxUploadSize="5400000"
p:uploadTempDir="fileUpload/temp">
</bean>
<!--==================== 配置异常处理 ====================-->
<!--使用@ExceptionHandler注解时注释掉,因为@ExceptionHandler注解方法不能有任何配置-->
<!--统一异常处理,托管MyExceptionHandler-->
<!--<bean class="exception.MyExceptionHandler"/>-->
<!--统一异常处理,使用SimpleMappingExceptionResolver异常处理器处理异常-->
<!--<bean class="org.springframework.web.servlet.handler.SimpleMappingExceptionResolver">-->
<!--<!–定义默认的异常处理页面,当该异常类型注册时使用–>-->
<!--<property name="defaultErrorView" value="error"/>-->
<!--<!–定义异常处理页面用来获取异常信息的变量名,默认名为exception–>-->
<!--<property name="exceptionAttribute" value="ex"/>-->
<!--<!–定义需要特殊处理的异常,用类名活完全路径名为key,异常页名为值–>-->
<!--<property name="exceptionMappings">-->
<!--<props>-->
<!--<prop key="exception.MyException">my-error</prop>-->
<!--<prop key="java.sql.SQLException">sql-error</prop>-->
<!--<!–这里还可以继续扩展对不同异常类型的处理–>-->
<!--</props>-->
<!--</property>-->
<!--</bean>-->
</beans>
|